Victoria Trafka, President and Principal Engineer, Engineering & Quality Solutions Inc.03.16.21
During my education toward my master’s degree, a professor teaching a product development course opened a lecture with this directive: “Make a lot of crappy prototypes fast.” I’m sure he wanted to grab students’ attention with this statement but he also wasn’t kidding. This professor had decades of industry experience and was giving his students a legitimate way to save time and money while still achieving desired results. I’ve recalled this advice and used it countless times as a PD engineer. So, what exactly did this professor mean? He further explained the intent was to make many rapid prototypes, each including an approximation of the product in some specific area of interest, and to make those prototypes in the quickest and cheapest way possible. The bottom line was you don’t need to make a full prototype with all features, finishes, and functions included in order to evaluate the design and gain valuable information. Doing so takes a lot of time and money, and usually isn’t necessary to meet the goal needed at any particular time.
Waiting until the design is basically finished to make a full prototype could lead to huge delays if the prototype reveals unexpected issues so far along in the development timeline. Instead, make limited or modified versions of the product meant to represent only one or a few aspects of the design at that time. Evaluate those aspects, gain insight, refine the design, and repeat the cycle. As the development process moves forward, prototypes will likely get more complete but the information gained in these smaller iterations is the key to agile product development and avoiding unexpected problems down the road.
In order to use this smarter prototyping approach, there are a few basic rules. First, look at the design as having several modules or separate chunks rather than a complete product. Ultimately, the modules are combined to create a finished product, but viewing the design this way allows for breaking it up into different parts for prototyping and evaluation purposes. Next, focus the prototype efforts into one or a few features or attributes that are critical pathways or relevant to the current stage of design. Fewer features simplifies the build and evaluation process, reduces cost, and eliminates distraction. Lastly, before manufacturing any parts, determine specific questions that need to be answered with a particular round of prototyping. With this rule, always keep the target audience in mind, meaning the people who are going to be evaluating the prototypes. Consider their goals and what level of detail they may need to provide the most valuable feedback. These three rules will allow you to concentrate prototyping efforts exactly where needed and gain better insight much quicker.
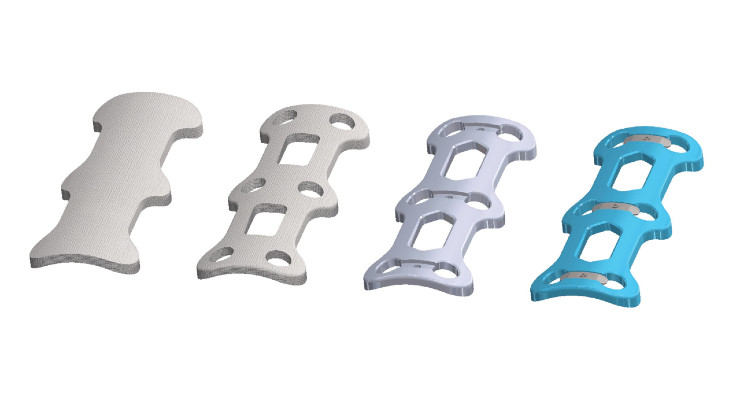
Usually, prototyping is needed to evaluate one of the following: cosmetic appearance, physical size and shape, or function. If the goal is appearance, size, or shape, the prototype build can be completely non-functional but needs to contain the representative external look and feel. This is the scenario most familiar to orthopedic engineers since they almost always start with a quick plastic version of the product to show to sales representatives and surgeons. If a realistic look is needed, these prototypes can be made in the intended color or surface finish to help convey the appearance of the final product. If the purpose is to evaluate function, then determine which functions or interfaces are being evaluated and only include those in the prototype. This prototype needs to have the features, materials, or even tolerances necessary for the applicable assessment. A simple example is a project where the final design is a complex anatomical plate with multiple angled threaded holes included; if the team needs to verify the hole and screw interface, it isn’t necessary to build the whole plate with all its final geometry. Instead, manufacture only a flat strip of material with representative threaded holes machined in it. This crude prototype will be perfectly suitable for initially testing the thread interface, and an excellent use of the second rule of breaking the design up into modules.
Tabletop 3D printers offer a relatively easy and affordable option for rapid prototyping, especially for orthopedic applications, since most of these parts fit inside the print envelope. Even if the product is too large for the machine’s print envelope, the part can be split into pieces, printed, and attached with epoxy. Many developers use these plastic printed prototypes to evaluate features like size, shape, ergonomics, cosmetics, etc., and to communicate design progress with other team members such as marketing and manufacturing representatives. One very valuable application of these printers is producing plastic prototypes to fill a graphic case in order to create a real-life representation of the whole system for surgeons and marketing. It’s important to remember rapid prototypes are a great option for a visual representation of the product, but not usually useful for functional evaluation or any kind of testing.
Modifying an existing similar product or creating a hybrid product with a combination of existing parts and newly made parts is a great option in many cases. This involves finding off-the-shelf parts and turning them into a representation of the new design. For instance, when prototyping a new instrument for initial evaluation, the working end can be machined and then attached to a handle from another prototype in the PD cabinet, avoiding the need to make the new handle. I once was working on a multi-axial pedicle screw design and wanted to test out the locking mechanism inside the tulip. Because the set screw and tulip threads were a custom form, the custom thread tool required to machine prototypes would take several extra weeks and several hundred dollars. So, I replaced the tulip threads with a standard thread of a similar size and ordered off-the-shelf set screws from an industrial supply source for a couple of dollars. I also didn’t bother to add the bone threads to the machined parts because they were irrelevant to the question at hand. This solution was quick, easy, and cost-effective, and worked well for the limited application of evaluating just the locking mechanism.
One of my colleagues is working on redesigning dozens of instruments in a spinal implant system to address market feedback related to functionality. Since so many instruments are being updated and there are multiple interacting parts, the development team wants to verify the redesigned system will work cohesively before they start ordering production products. Due to this intended purpose, the evaluation samples need to contain almost all of the final product functionality. But the prototypes are only going to be used in a mock sawbones procedure so it’s not necessary to use medical grade materials, or be concerned with sterility and product longevity. Therefore, the team has decided to prototype the full instrument set in aluminum rather than surgical steel, thereby saving about 70 percent on cost and 60 percent in lead time.
As the examples illustrate, varying levels of design completion can be used, and the more comprehensive the evaluation, the more complete and functional the prototypes should be. Options to make prototyping easier, faster, and less expensive are infinite. The goal is to be creative and resourceful. But there should always be an emphasis on learning and discovery before each prototype build. Prototypes must serve some predetermined and well-defined purpose, otherwise they’re just being built for fun. Or even worse, they could cause confusion or incorrect information gathering, which leads to improper development decisions. If you follow the three rules of breaking the design into modules, focusing on minimum requirements, and outlining questions the build needs to answer, your prototype efforts will lead to better designs, faster.
Victoria Trafka, BSME and MSME, president and principal engineer at Engineering & Quality Solutions Inc. Her passion is improving people’s mobility and quality of life with innovative medical devices. She has spent the majority of her career working within the orthopedic trauma and spine industry for a wide variety of companies from startups to global market leaders. While Trafka’s current focus is product development and quality systems, she has also held positions in manufacturing, quality, and project management. This varied experience helps her understand every step in the process from device idea to launch and long-term compliance, which results in a more robust product in less time.
Waiting until the design is basically finished to make a full prototype could lead to huge delays if the prototype reveals unexpected issues so far along in the development timeline. Instead, make limited or modified versions of the product meant to represent only one or a few aspects of the design at that time. Evaluate those aspects, gain insight, refine the design, and repeat the cycle. As the development process moves forward, prototypes will likely get more complete but the information gained in these smaller iterations is the key to agile product development and avoiding unexpected problems down the road.
In order to use this smarter prototyping approach, there are a few basic rules. First, look at the design as having several modules or separate chunks rather than a complete product. Ultimately, the modules are combined to create a finished product, but viewing the design this way allows for breaking it up into different parts for prototyping and evaluation purposes. Next, focus the prototype efforts into one or a few features or attributes that are critical pathways or relevant to the current stage of design. Fewer features simplifies the build and evaluation process, reduces cost, and eliminates distraction. Lastly, before manufacturing any parts, determine specific questions that need to be answered with a particular round of prototyping. With this rule, always keep the target audience in mind, meaning the people who are going to be evaluating the prototypes. Consider their goals and what level of detail they may need to provide the most valuable feedback. These three rules will allow you to concentrate prototyping efforts exactly where needed and gain better insight much quicker.
Usually, prototyping is needed to evaluate one of the following: cosmetic appearance, physical size and shape, or function. If the goal is appearance, size, or shape, the prototype build can be completely non-functional but needs to contain the representative external look and feel. This is the scenario most familiar to orthopedic engineers since they almost always start with a quick plastic version of the product to show to sales representatives and surgeons. If a realistic look is needed, these prototypes can be made in the intended color or surface finish to help convey the appearance of the final product. If the purpose is to evaluate function, then determine which functions or interfaces are being evaluated and only include those in the prototype. This prototype needs to have the features, materials, or even tolerances necessary for the applicable assessment. A simple example is a project where the final design is a complex anatomical plate with multiple angled threaded holes included; if the team needs to verify the hole and screw interface, it isn’t necessary to build the whole plate with all its final geometry. Instead, manufacture only a flat strip of material with representative threaded holes machined in it. This crude prototype will be perfectly suitable for initially testing the thread interface, and an excellent use of the second rule of breaking the design up into modules.
Tabletop 3D printers offer a relatively easy and affordable option for rapid prototyping, especially for orthopedic applications, since most of these parts fit inside the print envelope. Even if the product is too large for the machine’s print envelope, the part can be split into pieces, printed, and attached with epoxy. Many developers use these plastic printed prototypes to evaluate features like size, shape, ergonomics, cosmetics, etc., and to communicate design progress with other team members such as marketing and manufacturing representatives. One very valuable application of these printers is producing plastic prototypes to fill a graphic case in order to create a real-life representation of the whole system for surgeons and marketing. It’s important to remember rapid prototypes are a great option for a visual representation of the product, but not usually useful for functional evaluation or any kind of testing.
Modifying an existing similar product or creating a hybrid product with a combination of existing parts and newly made parts is a great option in many cases. This involves finding off-the-shelf parts and turning them into a representation of the new design. For instance, when prototyping a new instrument for initial evaluation, the working end can be machined and then attached to a handle from another prototype in the PD cabinet, avoiding the need to make the new handle. I once was working on a multi-axial pedicle screw design and wanted to test out the locking mechanism inside the tulip. Because the set screw and tulip threads were a custom form, the custom thread tool required to machine prototypes would take several extra weeks and several hundred dollars. So, I replaced the tulip threads with a standard thread of a similar size and ordered off-the-shelf set screws from an industrial supply source for a couple of dollars. I also didn’t bother to add the bone threads to the machined parts because they were irrelevant to the question at hand. This solution was quick, easy, and cost-effective, and worked well for the limited application of evaluating just the locking mechanism.
One of my colleagues is working on redesigning dozens of instruments in a spinal implant system to address market feedback related to functionality. Since so many instruments are being updated and there are multiple interacting parts, the development team wants to verify the redesigned system will work cohesively before they start ordering production products. Due to this intended purpose, the evaluation samples need to contain almost all of the final product functionality. But the prototypes are only going to be used in a mock sawbones procedure so it’s not necessary to use medical grade materials, or be concerned with sterility and product longevity. Therefore, the team has decided to prototype the full instrument set in aluminum rather than surgical steel, thereby saving about 70 percent on cost and 60 percent in lead time.
As the examples illustrate, varying levels of design completion can be used, and the more comprehensive the evaluation, the more complete and functional the prototypes should be. Options to make prototyping easier, faster, and less expensive are infinite. The goal is to be creative and resourceful. But there should always be an emphasis on learning and discovery before each prototype build. Prototypes must serve some predetermined and well-defined purpose, otherwise they’re just being built for fun. Or even worse, they could cause confusion or incorrect information gathering, which leads to improper development decisions. If you follow the three rules of breaking the design into modules, focusing on minimum requirements, and outlining questions the build needs to answer, your prototype efforts will lead to better designs, faster.
Victoria Trafka, BSME and MSME, president and principal engineer at Engineering & Quality Solutions Inc. Her passion is improving people’s mobility and quality of life with innovative medical devices. She has spent the majority of her career working within the orthopedic trauma and spine industry for a wide variety of companies from startups to global market leaders. While Trafka’s current focus is product development and quality systems, she has also held positions in manufacturing, quality, and project management. This varied experience helps her understand every step in the process from device idea to launch and long-term compliance, which results in a more robust product in less time.
